Virtual tours in homeschool settings are interactive digital experiences that simulate real locations, allowing students to explore museums, historical sites, science labs, and natural wonders without leaving home. Understanding how virtual tours work in homeschool settings gives parents and educators a practical tool for delivering immersive, curriculum-aligned learning that traditional textbooks simply cannot replicate. These experiences use technologies like 3D scanning, 360-degree photography, and video conferencing platforms to place students inside a digital environment they can actively navigate. The result is a form of educational virtual experience that combines visual immersion with structured learning activities designed to hold attention and deepen understanding.
How do virtual tours work in homeschool settings?
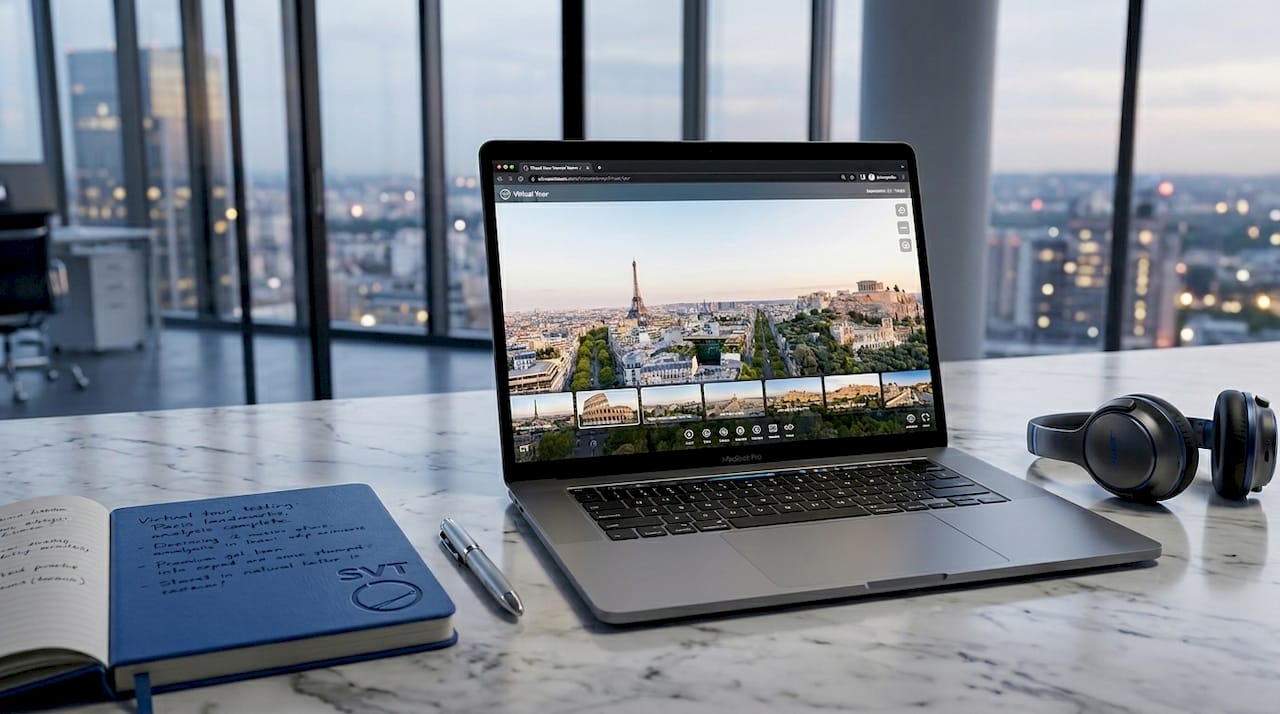
A virtual tour is built from a series of 360-degree spherical panoramas stitched together to create a navigable digital space. The industry standard term for this format is an interactive virtual tour, and it differs from a simple slideshow or video because the viewer controls movement and exploration. Tools like Matterport use 3D scanning technology to capture physical spaces with precise spatial accuracy. Professional 3D scanning typically takes 15 to 30 minutes per room, with finished assets delivered within one to two business days. That speed means a school or museum can publish a fully navigable tour quickly, making fresh content available to homeschoolers on a regular basis.
The pedagogical design behind effective virtual tours matters as much as the technology. Rather than passively watching a video, students in a well-designed virtual tour encounter interactive stations, embedded information panels, and navigation hotspots that prompt decision-making. Platforms like Flat.social build virtual field trip environments with NPC characters, spatial audio, and interactive whiteboards that encourage active collaboration between students and facilitators. This active exploration model is what separates a genuinely educational virtual experience from a glorified screen session.
Here is what the technical workflow looks like from a homeschool parent's perspective:
- 360-degree capture: A camera with a fisheye lens or a dedicated 360 camera photographs a space from multiple positions, producing equirectangular images.
- Stitching and hosting: Software assembles those images into a navigable tour hosted on a cloud or self-hosted platform.
- Interactive layers: Educators add hotspots, text panels, audio narration, quizzes, or embedded video to guide learning.
- Live session overlay: Some platforms support live guided sessions where a facilitator controls navigation in real time while students follow along via video conferencing.
Pro Tip: If you are running a live virtual tour session with multiple homeschool students, use a platform that supports breakout rooms or spatial audio so small groups can explore independently before reconvening for a group debrief.
What are the benefits of virtual tours compared to traditional field trips?
Virtual field trips eliminate transport, food, and admission costs entirely, making them significantly more affordable than physical outings. For homeschooling families operating on a single income or tight budget, that cost difference is not trivial. Beyond money, virtual tours remove the logistical friction of coordinating schedules, arranging supervision, and managing travel for students with mobility challenges or chronic health conditions.
The accessibility advantage extends to geography. A family homeschooling in rural Montana can tour the Smithsonian National Museum of Natural History, the Louvre in Paris, or the surface of Mars through NASA's virtual experiences, all in the same week. That kind of global exposure is genuinely impossible through traditional field trips for most families. Virtual tours also open access to restricted or dangerous locations, including active archaeological digs, nuclear research facilities, and deep-sea environments, that no school group could visit in person.
| Factor | Traditional field trip | Virtual tour |
|---|---|---|
| Cost | Transport, admission, food | Typically free or low-cost subscription |
| Scheduling | Fixed date, weather-dependent | Any time, any day |
| Accessibility | Physical mobility required | Available to all learners |
| Location range | Local or regional | Global and beyond |
| Repeat visits | Expensive to repeat | Unlimited replays |
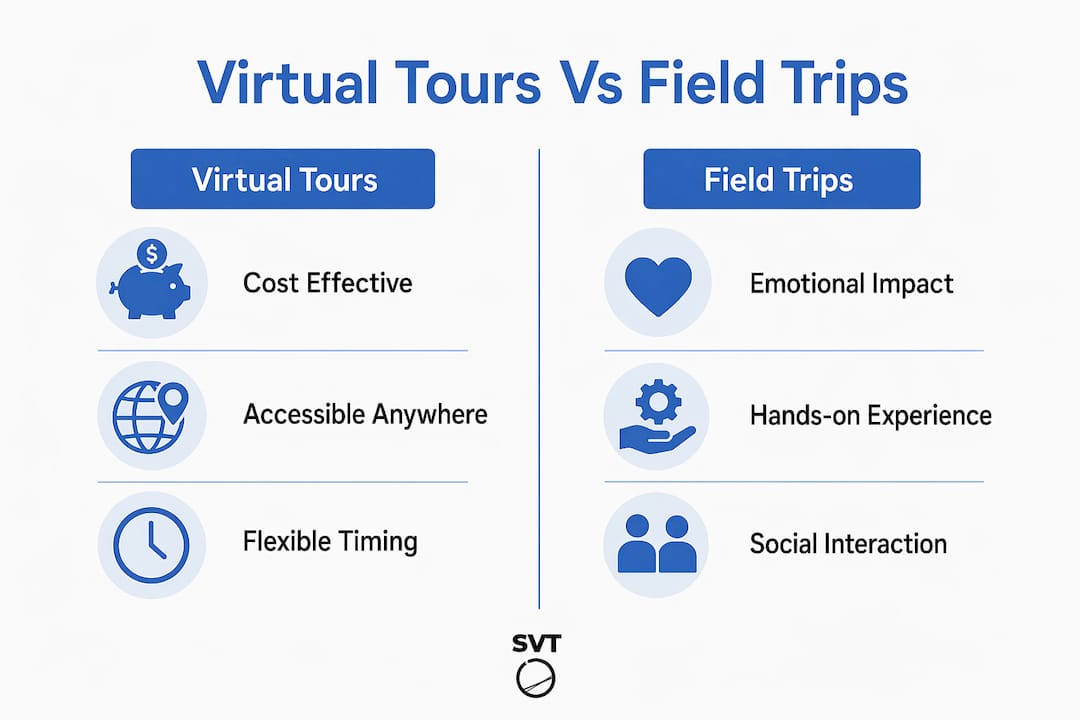
That said, virtual tours complement rather than fully replace in-person experiences. Physical trips build emotional memory and social cohesion in ways that screens cannot. The practical position for homeschooling families is to use virtual tours as the primary vehicle for sites that are geographically or financially out of reach, and reserve in-person visits for local destinations where the sensory experience adds clear value.
What are best practices for facilitating virtual tours in homeschool settings?
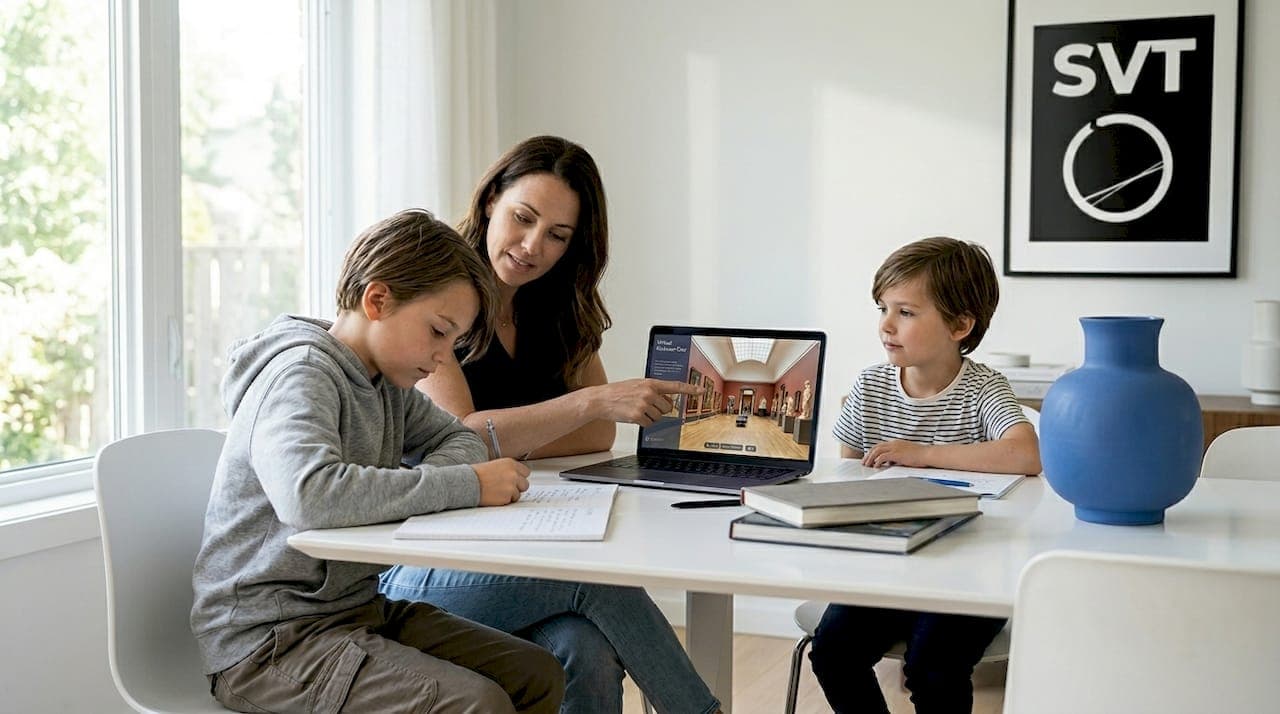
The single biggest factor in whether a virtual tour produces real learning is the role of the facilitator. Passive consumption of virtual tours is measurably less effective than active, guided exploration. Parents and educators who ask probing questions, pause the tour to discuss observations, and connect what students see to prior knowledge produce significantly better learning outcomes than those who simply press play and step away.
The most effective facilitation framework follows four stages:
- Pre-tour briefing: Introduce the location, its significance, and the learning objective. Give students a specific question or mission to answer during the tour. This primes attention and gives the experience a clear purpose.
- Structured exploration: Use mission-driven frameworks like scavenger hunts, observation worksheets, or guided questions to keep students actively engaged rather than passively clicking through scenes.
- Small group discussion: If you are facilitating for a co-op or group of homeschoolers, use breakout rooms or spatial audio features to let students explore together and share discoveries in real time.
- Post-tour debrief: Ask students to summarize what they observed, sketch a key artifact or scene from memory, and connect the experience to a related reading or project. This reflection step is where long-term retention is built.
Note-taking during the tour itself also matters. Encourage students to write down three observations and one question they still have. That simple habit transforms a passive viewing session into an active inquiry exercise.
Pro Tip: Build a short vocabulary list of five to ten terms before the tour begins. Ask students to spot each term in context during the tour. This technique works especially well for science and history virtual tours where domain-specific language is dense.
What technology and preparation do you need for virtual tours?
Running a smooth virtual tour in a homeschool setting does not require expensive equipment, but it does require deliberate preparation. Here is what you need to have in place before your first session:
- Device: A laptop, tablet, or desktop computer with a modern browser handles most virtual tour platforms without additional software. Smartphones work for self-paced tours but are less practical for live facilitated sessions.
- Internet connection: A stable broadband connection is the baseline requirement. Families using mobile hotspots should test download speeds before a scheduled session. Mobile hotspots and offline backups are the recommended fallback for families in areas with unreliable connectivity.
- Offline content: For homeschooling families who travel or live in remote areas, downloading video-based tours in advance eliminates the risk of a session failing mid-lesson due to dropped internet.
- Audio and video: A headset with a microphone improves the experience during live guided sessions, particularly when spatial audio is part of the platform's feature set.
- Platform selection: Choose a platform that matches your use case. For consuming existing tours, free platforms from museums and cultural institutions work well. For creating your own custom tours tied to your curriculum, a dedicated tool like Simple Virtual Tour gives you full control over content and interactivity.
Permissions and scheduling matter when using live guided sessions offered by museums or educational organizations. Many institutions offer scheduled virtual classroom tours for education groups, and slots fill quickly. Book at least two to three weeks in advance and confirm the technical requirements with the host organization before the session date.
How do you integrate virtual tours into homeschool curricula?
Virtual tours are not a standalone activity. They produce the most learning value when connected directly to what students are already studying. Here is how that integration works across core subjects:
- History: Tour the Colosseum in Rome or the Gettysburg battlefield while studying ancient civilizations or the Civil War. Pair the tour with a primary source reading and a map activity.
- Science: Use NASA's Mars exploration virtual experiences or virtual lab simulations from platforms like Labster to bring scientific environments to life. Follow up with a hands-on experiment that mirrors what students observed.
- Art: The Google Arts and Culture platform offers virtual walkthroughs of major galleries including the Uffizi and the Metropolitan Museum of Art. Assign students to identify one artwork and write a short analysis connecting it to the artistic period being studied.
- Geography: Virtual tours of national parks, international cities, and natural landmarks give geography lessons a visual anchor that maps and textbooks cannot provide.
Tailoring the experience to age matters. Younger students (ages 6 to 10) benefit from shorter tours of 15 to 20 minutes with a single focused mission. Older students (ages 11 and up) can handle longer sessions, more complex observation tasks, and independent research projects that extend the virtual experience into a multi-day unit.
Tracking progress is straightforward. A simple learning journal where students record observations, sketches, and reflections after each tour creates a documented record of experiential learning that satisfies most homeschool portfolio requirements. Virtual tours influence approximately 45% of enrollment decisions in higher education, which signals how seriously institutions take immersive digital experiences as a legitimate form of engagement and learning.
Key takeaways
Virtual tours work best in homeschool settings when active facilitation, structured missions, and curriculum integration replace passive viewing.
| Point | Details |
|---|---|
| Technology foundation | Virtual tours use 360-degree photography and 3D scanning to create navigable digital environments. |
| Active facilitation wins | Facilitators who use scavenger hunts, probing questions, and debriefs produce measurably better learning outcomes. |
| Cost and access advantages | Virtual tours eliminate transport and admission costs while opening access to global and restricted sites. |
| Preparation is non-negotiable | Stable internet, offline backups, and pre-tour briefings determine whether a session succeeds or fails. |
| Curriculum integration | Connecting virtual tours to active subjects and follow-up projects turns a single session into a multi-day learning unit. |
Why I think most homeschoolers are underusing virtual tours
I have watched parents treat virtual tours as a reward activity, something to pull out on a Friday afternoon when the "real" schoolwork is done. That framing undersells what these tools actually are. A well-facilitated virtual tour of a Roman forum, paired with a primary source reading and a sketch assignment, is a more rigorous history lesson than most textbook chapters. The immersive format activates spatial memory in a way that reading alone does not.
The honest challenge is screen time. Parents are right to be cautious about adding more hours in front of a device. The answer is not to avoid virtual tours but to treat them the way you would treat a physical field trip: purposeful, time-limited, and followed by offline activity. A 25-minute virtual tour followed by 20 minutes of drawing, writing, or building something tangible keeps the balance right.
The future of this space is genuinely exciting. As VR headsets like the Meta Quest become more affordable and educational content libraries grow, the line between "virtual tour" and "being there" will continue to blur. Homeschooling families who build comfort with these tools now will be well-positioned to use the next generation of immersive learning experiences as they arrive. Start with what is available today, build the facilitation habits, and the technology will keep improving around you.
— Andrea
Bring virtual tours into your homeschool with Simple Virtual Tour
Simple Virtual Tour gives homeschool parents and educators the ability to create unlimited interactive tours without any technical background. You can build custom virtual tours of local museums, your own home learning environment, or any space relevant to your curriculum, then add hotspots, audio narration, quizzes, and information panels that align with your lesson objectives. The platform supports both cloud-hosted and self-hosted deployment, so you control your content and your costs. With live session capabilities built in, you can guide a group of co-op students through a tour in real time, just like a professional educator. Explore the 360-degree photo creation guide on the Simple Virtual Tour blog to get started with your first tour today.
FAQ
What technology powers a virtual tour?
Virtual tours are built from 360-degree spherical panoramas captured with fisheye or dedicated 360 cameras, then assembled into navigable digital environments using stitching software. Interactive layers like hotspots, audio, and quizzes are added through a hosting platform.
How long should a virtual tour session be for homeschoolers?
Students aged 6 to 10 benefit most from sessions of 15 to 20 minutes with a single focused mission. Older students can engage productively with sessions up to 45 minutes when paired with structured observation tasks and a post-tour debrief.
Do virtual tours require fast internet?
A stable broadband connection is the baseline requirement. Families with unreliable internet should download video-based tour content in advance, as offline access prevents session disruptions during travel or in remote locations.
Can I create my own virtual tours for my homeschool curriculum?
Yes. Platforms like Simple Virtual Tour allow you to capture 360-degree images of any location and build fully interactive tours with educational content layers, no technical expertise required.
Are virtual tours a replacement for physical field trips?
Virtual tours are not a full replacement. They are most effective for sites that are geographically, financially, or physically inaccessible, while in-person visits remain valuable for building emotional memory and social experience.