
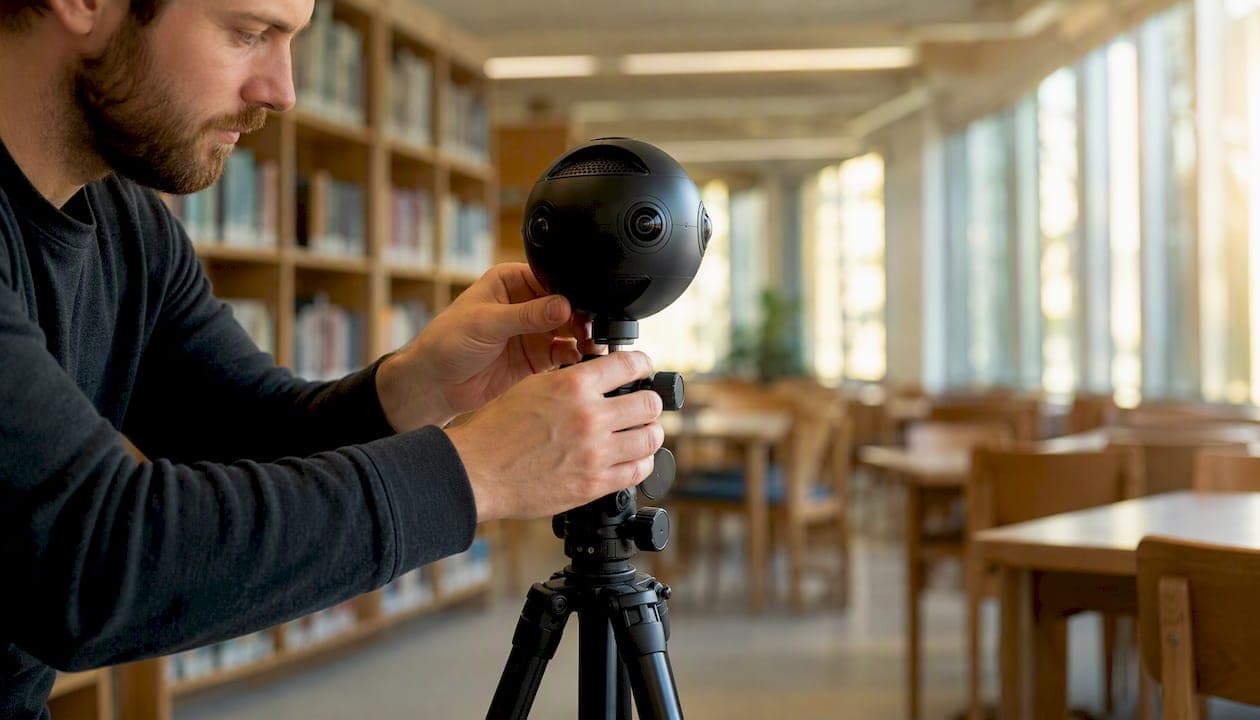
The fastest way to build an education-ready virtual environment is to combine 360° panoramas, interactive hotspots, and a hosting platform with live session capability, then run one guided session to confirm the learning flow works. You need three things right now: a 360° camera to capture the space, software that adds interactivity, and a publish-and-host workflow that supports live walkthroughs. Simple Virtual Tour covers all three, with both cloud-hosted and self-hosted options and over 1,400 active users across real estate, tourism, museums, and education.
- Capture: a 360° camera or DSLR with a fisheye lens to produce equirectangular images
- Interactivity: hotspots, guided navigation, and embedded quizzes tied to learning objectives
- Publish and validate: host the tour, embed it on your site or LMS, and run one live guided session
Start with a single-room pilot. Publish it, share the link with five learners, and watch where they click. That feedback loop is more valuable than any pre-launch planning session.
Pro Tip: Front-load your tour's strongest learning artifact in the first 30 seconds. Learners decide whether to stay almost immediately, so lead with the most compelling stop, not the entrance hallway.
Key Takeaways
A complete remote learning virtual environment setup requires 360° panoramas, interactive hotspots, live session capability, and analytics, all connected to your existing site or LMS.
| Point | Details |
|---|---|
| Start with one room | Capture one space, add two hotspots, and run one live session before scaling. |
| Session time impact | Tours with 360° interactivity can lift session times from 1–2 minutes to 4–6 minutes. |
| Engage every 5–7 minutes | Build a quiz prompt or facilitator question into live sessions at 5–7 minute intervals. |
| Cloud vs. self-hosted | Choose cloud for speed and low maintenance; choose self-hosted for data control under FERPA or state privacy law. |
| Simple Virtual Tour | Supports cloud and self-hosted deployment, live sessions, analytics, and e-commerce integration for venues of any size. |
Table of Contents
- What does a remote-learning virtual environment need to include?
- What hardware and capture practices do you need for 360° learning tours?
- How do you choose between cloud-hosted and self-hosted software?
- How do you set up a remote-learning virtual tour step by step?
- How do you design a tour specifically for learning outcomes?
- How do you embed, integrate, and track learner interaction?
- What does a pilot cost, and how long does it take?
- How do you troubleshoot problems and maintain the tour over time?
- How do different audiences use learning-focused virtual tours?
- What actually matters when building learning tours
- Simple Virtual Tour gives you the tools to run this from day one
- Sources
What does a remote-learning virtual environment need to include?
A learning-focused interactive tour is not simply a photo gallery you can click through. It needs four functional layers working together.
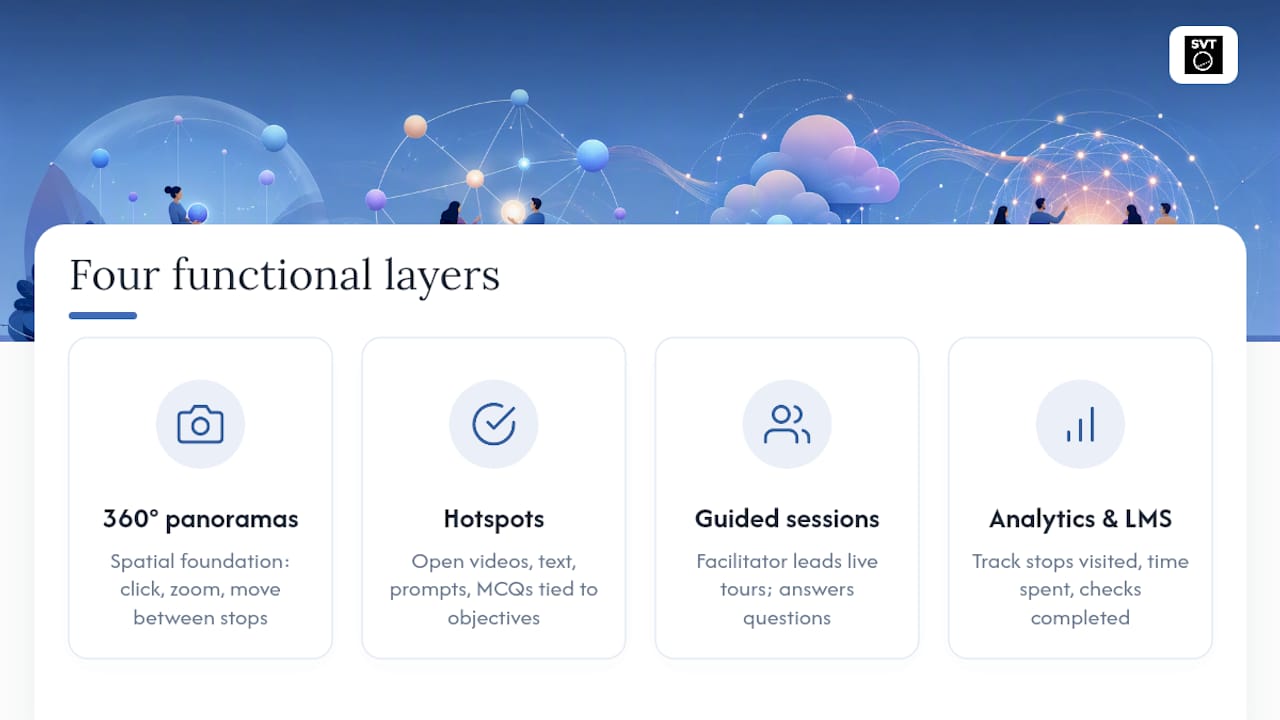
360° panoramas form the spatial foundation. Learners click and drag to look around, zoom into details, and move between stops, which creates the sense of physical presence that static images cannot replicate. Sites using 360° virtual tours commonly see session times rise from a short duration to a noticeably longer duration, a signal that spatial interactivity holds attention in ways flat media does not.
Hotspots and micro-assessments turn passive viewing into active learning. A hotspot can open a short video clip, a text explanation, a reflective prompt, or a multiple-choice question. Tie each one to a measurable objective so learners know what they are supposed to take away from that stop.
Guided live sessions let a facilitator walk a group through the tour in real time, answer questions, and direct attention to specific hotspots. This mirrors the structure of a physical site visit without travel costs.
Analytics and LMS hooks close the loop. You need data on which stops learners visited, how long they spent, and whether they completed embedded checks. Without that data, you are guessing at what worked.
Cross-device compatibility is non-negotiable. Tours must run on desktop, mobile, tablet, and VR headsets so no learner is excluded by their hardware. Accessibility requirements, including keyboard navigation, sufficient color contrast, and alt metadata for panoramas, belong in the design brief from day one, not as an afterthought.
Pro Tip: Run a single-room pilot with a small group before building a full multi-stop tour. One room, two hotspots, and one live session will reveal navigation problems you would never catch in a solo preview.
What hardware and capture practices do you need for 360° learning tours?
Good capture is the foundation everything else rests on. Weak panoramas cannot be fixed in editing.
Recommended equipment:
- 360° camera (Ricoh Theta series, Insta360 X series, or equivalent): the fastest path to a clean spherical panorama; ideal for prerecorded educational tours where image quality and stitching accuracy matter most.
- DSLR with a fisheye lens on a nodal head: higher resolution for large spaces like museum galleries or event halls; requires more post-processing but produces sharper detail at zoom.
- Recent smartphone (for live walkthroughs): choose a smartphone for live sessions and a dedicated 360° camera or DSLR for prerecorded content; mixing the two adds unnecessary complexity.
- Sturdy tripod with a panoramic head: keeps the camera at a consistent height between stops, which is critical for learner orientation when moving through a space.
- Lavalier or shotgun microphone: narration clarity drops sharply with built-in camera audio in reverberant spaces like warehouses, gyms, or stone-walled museums.
Capture best practices:
- Bracket exposures at each stop (at minimum: standard, +1 EV, –1 EV) so you can HDR-blend for even lighting across bright windows and dark corners.
- Lock white balance before you start and keep it consistent across all stops in a session.
- Overlap panorama positions by at least 30% when mapping a circulation route so learners can navigate between stops without spatial jumps.
- Mark your planned "learning stops" on a floor plan before you arrive. Entrances, key exhibits, equipment stations, and decision points all make strong stops.
- In noisy spaces, record a short ambient audio sample first, then test mic placement before committing to a full capture run.
How do you choose between cloud-hosted and self-hosted software?
The deployment decision shapes your cost structure, data control, and update cadence for the life of the project.
Cloud-hosted platforms handle server maintenance, security patches, and uptime for you. Updates roll out automatically, which matters when you are running live sessions and cannot afford downtime. The trade-off is a recurring subscription fee and the fact that learner interaction data lives on the vendor's infrastructure.
Self-hosted gives U.S. organizations full control over where data is stored, which is relevant for K–12 districts and higher-education institutions operating under FERPA or state-level student privacy laws. The one-time purchase cost is often lower over a three-year horizon, but your IT team owns maintenance and uptime.
Must-have features regardless of deployment model:
- Guided live session capability with facilitator controls
- Hotspot types that support quizzes, embedded media, and external links
- Analytics dashboard showing time-on-stop and interaction counts
- Multilingual UI for diverse learner populations
- API or plugin hooks for LMS or CRM integration
- Custom branding to match your organization's identity
Simple Virtual Tour supports both cloud and self-hosted deployment, live session hosting, e-commerce integration, and an analytics backend, making it a practical fit for solo educators and mid-sized venues alike. The platform's intuitive backend means non-technical staff can publish and update tours without developer support.
How do you set up a remote-learning virtual tour step by step?
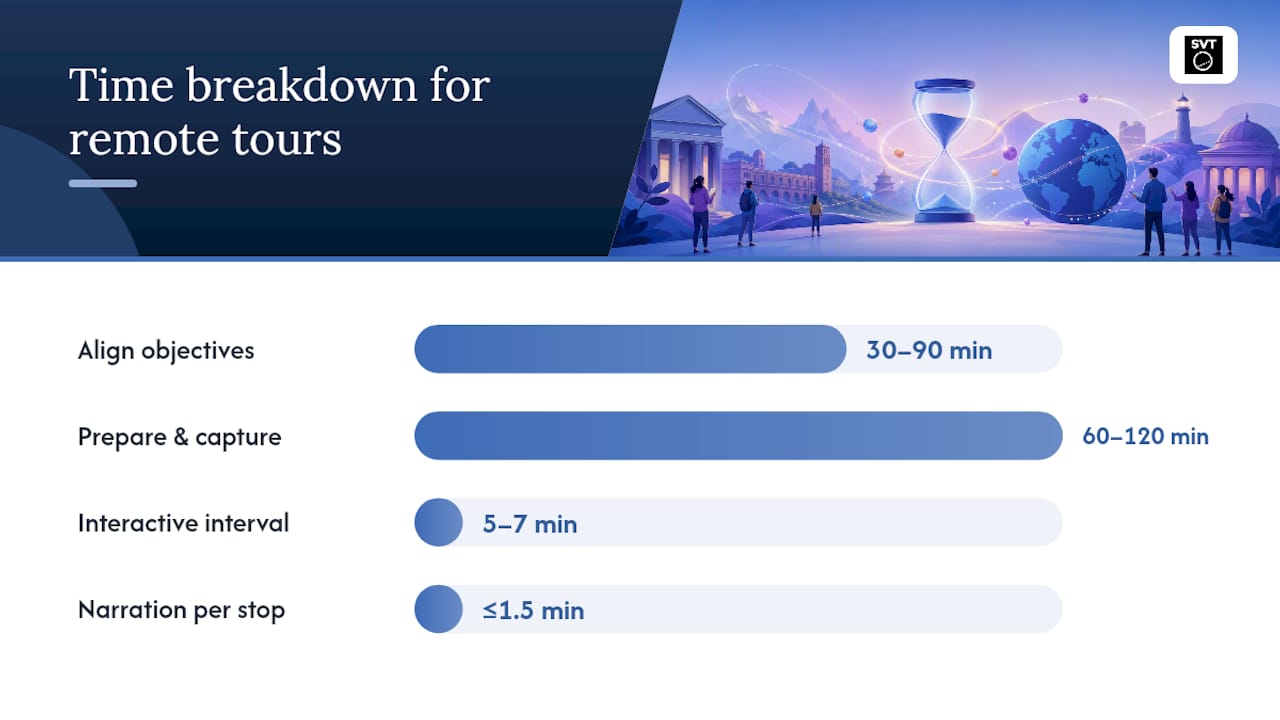
- Align objectives and map stops (30–90 minutes). Write one or two measurable learning outcomes per stop before you touch a camera. A museum educator might write: "Learners will identify three characteristics of Impressionist brushwork at this painting station." That objective drives every hotspot and quiz you add later.
- Prepare the space and capture (1–2 hours for a small venue). Clear clutter, check lighting, and place temporary signage at each stop if learners will visit in person later. Capture panoramas in the planned sequence, bracketing exposures at each position.
- Edit, stitch, and add interactivity. Import equirectangular images, stitch if needed, then add hotspots, labels, and short formative checks. Keep narration clips under 90 seconds per stop; longer clips lose attention.
- Publish, embed, and schedule a live session. Embed the tour via iframe on your site or LMS, then schedule one live guided walkthrough. Promote the session via email and social media and add a registration link near the tour embed to convert viewers into enrolled participants.
- Run the live session and iterate. Review analytics after the session: which stops had the lowest dwell time? Which hotspots were skipped? Revise those stops before the next cohort.
Interactive moments every 5–7 minutes keep passive viewers engaged during live sessions. Build a quiz prompt or a facilitator question into the session plan at those intervals.
Pro Tip: Always rehearse the live session on the same network you will use for the real event. A secondary device on a mobile hotspot is your fastest fallback if the primary connection drops.
Pro Tip: Pre-load a short recorded clip of the tour's key stop. If live streaming fails mid-session, switching to the clip keeps learners engaged while you reconnect.
How do you design a tour specifically for learning outcomes?
Learning design inside a virtual tour follows the same principles as any instructional sequence, applied to a spatial medium.
- Signal objectives at each stop. A brief text overlay or audio intro ("At this station, you will learn how…") orients learners before they interact with hotspots.
- Use a defined start point and visible progress markers. Learner disorientation is the single biggest drop-off cause in self-paced tours. A clear "Start Here" hotspot and a numbered stop sequence reduce confusion immediately.
- Design micro-learning moments of 30–90 seconds. A hotspot that opens a 45-second video clip explaining a process, followed by a two-question quiz, is a complete micro-lesson. Student engagement strategies built around this pattern consistently outperform long-form narration in retention.
- Accessibility checklist: captions on all audio and video content; keyboard navigation through all hotspots; color contrast ratio of at least 4.5:1 for text overlays; alt metadata on every panorama for screen readers.
Pro Tip: Test your published tour with a screen reader and on a mobile device in airplane mode. Airplane mode reveals which assets are cached locally and which require a live connection, exposing hidden load dependencies before learners encounter them.
How do you embed, integrate, and track learner interaction?
Embedding options:
- iframe embed: paste one line of code into any website or LMS page; works for most use cases and requires no developer involvement.
- Direct link: share a URL for email campaigns, social posts, or QR codes placed in physical spaces. Embedding tours on your site and Google Business Profile and linking them in email proposals drives both enrollment and bookings.
- API or SDK hooks: connect the tour to your CRM or LMS for single-sign-on, automated enrollment, and richer data capture; requires developer time but unlocks SCORM/xAPI-compatible tracking.
For analytics, track time-on-stop, hotspot interaction rates, quiz completion, and live session attendance. When embedding across domains, confirm CORS headers are configured correctly on your hosting environment to prevent blocked asset loads.
What does a pilot cost, and how long does it take?
Staffing roles for a pilot:
- Project lead: defines objectives, maps stops, and coordinates the team
- Capture operator: handles camera, tripod, and audio gear on site
- Content author: adds hotspots, quiz questions, and narration in the editing platform
- Live session facilitator: runs the guided walkthrough and monitors the chat or Q&A
Cost drivers beyond the platform fee include custom staging for a space, paid plugins for advanced LMS integration, and IT labor for self-hosted maintenance.
How do you troubleshoot problems and maintain the tour over time?
| Problem | Quick Fix | Escalate to IT When |
|---|---|---|
| Bad stitching at panorama seams | Re-export from raw files with manual control point alignment | Seams persist after three re-exports |
| Slow load times | Compress panoramas to JPEG at high quality; reduce max resolution | Load time exceeds 8 seconds on a standard broadband connection |
| Broken hotspots after update | Re-link hotspot targets in the editor and republish | Hotspots break across all tours simultaneously |
| Live-stream lag or dropout | Switch to mobile hotspot; reduce stream resolution | Lag persists on multiple networks |
Maintenance checklist:
- Update panoramas within 30 days of any major physical change to the space (renovation, new signage, layout shift).
- Review analytics monthly; retire stops with consistently low dwell time.
- Archive tours that are more than two years old or tied to discontinued programs.
- For U.S. organizations: redact personally identifiable information visible in imagery (whiteboards, name tags, posted schedules) before publishing; secure any learner data collected via embedded forms under applicable state privacy law.
How do different audiences use learning-focused virtual tours?
- Real estate agents: use a multi-stop tour of a property to walk buyer clients through layout and features; add a hotspot at each room with a spec sheet and a "Schedule a Showing" CTA. The same tour asset serves both the listing page and a buyer education session.
- Tourism professionals: build a destination preview tour with hotspots explaining local history and logistics; Virtual tours in homeschool and small-group settings follow the same pattern for field-trip preparation.
- Museums: anchor each gallery stop to a collection object with a 90-second curator audio clip and a reflective prompt; cultural site tour ideas show how to structure these for K–12 curriculum alignment.
- Event planners: publish a venue walkthrough with capacity callouts and floor plan hotspots; add a booking form embed near the tour to convert viewers directly.
- Educators: map each tour stop to a course learning objective, embed the tour in the LMS, and assign it as pre-class preparation so live session time focuses on discussion rather than orientation.
A single well-produced tour asset can serve sales, learning, and accessibility goals simultaneously, which makes the per-unit production cost easier to justify.
What actually matters when building learning tours
Most teams spend too long on camera gear and not long enough on learning objectives. A tour captured on a mid-range 360° camera with clear hotspot structure and a well-run live session will outperform a photorealistic tour with no instructional design behind it. The spatial fidelity of 360° imagery matters, but it is the interactivity and the facilitated session that drive retention.
The other underestimated factor is the first 30 seconds. Whether you are running a live session or publishing a self-paced tour, learners make a stay-or-leave decision almost immediately. Front-loading the most compelling stop, not the entrance, is the single highest-leverage design choice you can make.
Technology's role in education has shifted toward immersive, place-based experiences precisely because passive video cannot replicate the spatial reasoning that physical environments develop. Interactive 360° tours close that gap without requiring travel, and the analytics layer gives educators something a field trip never could: documented evidence of where learners spent their attention.
Simple Virtual Tour gives you the tools to run this from day one
Building a learning-focused virtual environment does not require a large production budget or a dedicated IT team. Simple Virtual Tour gives educators, venue managers, and tourism professionals a platform that handles the full workflow: capture-ready 360° panorama support, interactive hotspots, live session hosting, and an analytics dashboard, all from one backend that non-technical staff can operate confidently.
Solo educators can start with the cloud-hosted plan and publish a pilot tour in an afternoon. Mid-sized museums and event venues that need data sovereignty can choose the self-hosted option and keep all learner interaction data on their own infrastructure. Enterprise venues managing multiple locations can use the API and plugin layer to connect tours to existing LMS or CRM systems.
Over 1,400 organizations are already using Simple Virtual Tour to present physical spaces online. Start your pilot today with a single-room tour, run one live guided session, and use the analytics to decide what to build next.
Sources
- How 360 Virtual Tours Improve Customer Engagement & Trust
- Virtual Open House Best Practices for Leads
- How to Host a Successful Virtual Open House in 2026 - Luxury Presence
- Aivju